Linux 安装 Clash 和 WebUI (无桌面环境) Mihomo GUI图形化界面
这里以Debian12为例进行部署,请确保安装了基本的gzip,git,nano软件包
遇到文章有问题可以在下面评论区指出~
配置mihomo
先创建一个目录用于存放程序和配置
cd /opt
sudo mkdir Clash
cd Clash
然后在github或者其他地方上找到mihomo下载链接(下方链接是amd64架构的,如果是arm等其他架构需要自行选择),使用wget或者curl下载到Clash文件夹下
sudo wget https://ghproxy.cn/https://github.com/MetaCubeX/mihomo/releases/download/v1.18.10/mihomo-linux-amd64-compatible-go120-v1.18.10.gz
解压,重命名为mihomo()
sudo gzip -d mihomo-linux-amd64-compatible-go120-v1.18.10.gz
sudo mv mihomo-linux-amd64-compatible-go120-v1.18.10 mihomo
给予执行权限
sudo chmod +x mihomo
然后在github或者其他地方上找到MMDB文件(GeoIP数据库),并下载到刚才创建的Clash文件夹下
sudo wget https://ghproxy.cn/https://github.com/MetaCubeX/meta-rules-dat/releases/download/latest/geoip.metadb
配置 metacubexd WebUI面板
在github或者其他地方上找到WebUI的git仓库,并使用git克隆到本地
sudo git clone https://ghproxy.cn/https://github.com/metacubex/metacubexd.git -b gh-pages ./ui
接下来通过你的
直接手动编写 或者
机场订阅链接(下面三种方法不支持base64格式)
来获得你的配置文件(订阅文件),
#方法1:
sudo wget -O ./config.yaml [你的订阅链接]
#方法2:
sudo curl -o ./config.yaml [你的订阅链接]
#方法3:
sudo curl [你的订阅链接] > ./config.yaml

#如果以上方法都失败,那你只能手动编写你的配置文件,比如使用nano,vim等编辑器编辑。
#(如果你有在使用Clash Verge,则你可以在Clash Verge的设置->Verge高级配置->当前配置 直接复制粘贴进配置文件。)
配置文件的名字要命名为config.yaml,如果不是,可以使用mv命令更改
sudo mv [配置文件] ./config.yaml
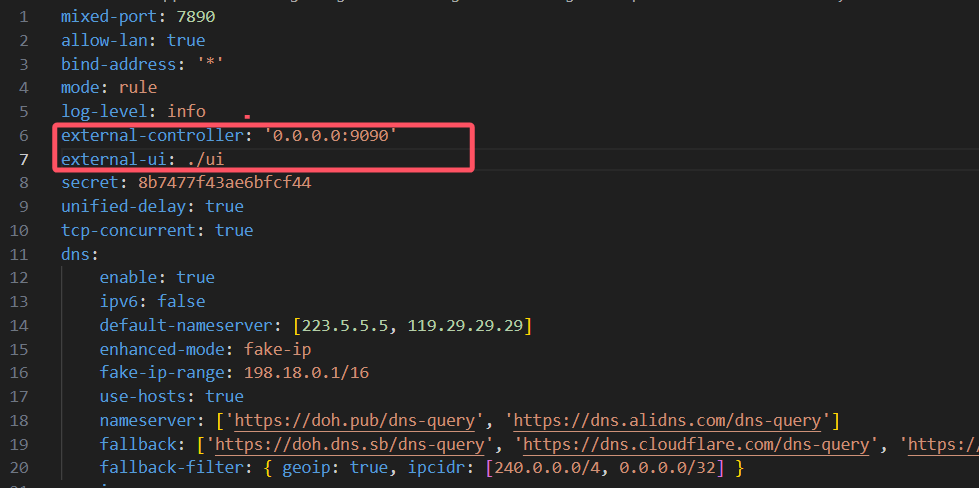
确保获取到的config.yaml配置文件中external-ui、external-controller、secret配置正确
(如果没有这三个配置项就自己在文件头部加上)
external-ui配置示例:external-ui: ./ui
参数说明:“./ui”路径是刚刚克隆到本地的WebUI仓库路径
external-controller示例:external-controller: 0.0.0.0:9090
参数说明:“0.0.0.0:9090”是指定mihomo控制API监听的ip以及端口设置为,如果已经在内网环境下可以设置为0.0.0.0:9090允许外部ip连接,但如果机器直接暴露在公网,则应该配置secret密码来保证安全性或者直接用127.0.0.1:9090仅允许本地访问。
secret示例:secret: clashpassword
注意事项:如果系统有防火墙,请在防火墙设置处放行这个端口或者直接关闭防火墙。例如ubuntu,需要在 ufw 中放行 9090 端口。
基本WebUI服务即部署完成,
这时只需要加参数执行mihomo即可启动(这里 ./ 是指定工作目录,目录内需要存在刚才修改的config.yaml配置文件)
sudo ./mihomo -d ./
这时即可在浏览器访问http://[ip地址]:9090/ui 即可打开WebUI控制面板。
在第一个框内填写http://[ip地址]:9090,第二个框内填写刚才secret设置的密码,再点击添加按钮即可连接到mihomo后端,这样就能比较容易的进行更改节点,比如打开tun模式等操作。
添加到systemd服务
sudo nano /etc/systemd/system/mihomo.service
[Unit]
Description=mihomo Daemon, Another Clash Kernel.
After=network.target NetworkManager.service systemd-networkd.service iwd.service

[Service]
Type=simple
LimitNPROC=500
LimitNOFILE=1000000
CapabilityBoundingSet=CAP_NET_ADMIN CAP_NET_RAW CAP_NET_BIND_SERVICE CAP_SYS_TIME CAP_SYS_PTRACE CAP_DAC_READ_SEARCH CAP_DAC_OVERRIDE
AmbientCapabilities=CAP_NET_ADMIN CAP_NET_RAW CAP_NET_BIND_SERVICE CAP_SYS_TIME CAP_SYS_PTRACE CAP_DAC_READ_SEARCH CAP_DAC_OVERRIDE
Restart=always
ExecStartPre=/usr/bin/sleep 1s
ExecStart=/opt/Clash/mihomo -d /opt/Clash/
ExecReload=/bin/kill -HUP $MAINPID

[Install]
WantedBy=multi-user.target
注意:请保证上面的 ExecStart 配置中 /opt/Clash/mihomo 和 /opt/Clash/ 路径正确,为你自己的mihomo程序路径和工作路径
使用以下命令重新加载 systemd
systemctl daemon-reload
启用 mihomo 服务
systemctl enable mihomo
使用以下命令启动 mihomo
systemctl start mihomo
使用以下命令关闭 mihomo
systemctl stop mihomo
使用以下命令重启 mihomo
systemctl restart mihomo
更多请参考https://wiki.metacubex.one/startup/service/
参考文档:
Linux搭建mihomo(2024.8.11) - なのです!
https://wiki.metacubex.one/startup/service/
本站所有文章内容仅供学习了解,非盈利目的,请于下载后 24 小时内删除,不得用作任何商业用途。文字、数据及图片均有所属版权,如转载须注明来源。
务必循遵守所在地、所在国家和用户所在国家的法律法规,作者不对使用者任何不当行为负责。